|
Step 1: The Basics of a 7" Wet Tile Saw Hopefully, this Instruct able will make them wish and needing a tile saw yourself. Dread not, they are not as frightening as you believe, are extremely reasonable, and may even be in your carport as of now. This instructional exercise depends on the utilization of a 7" QEP wet tile saw. Many home change stores offer wet tile saws; which are expected for use in cutting tiles for mosaic furthermore, different ventures, for example, back-splashes, ledges, washrooms, kitchens, and so forth. It is an electrically worked saw which works with water. 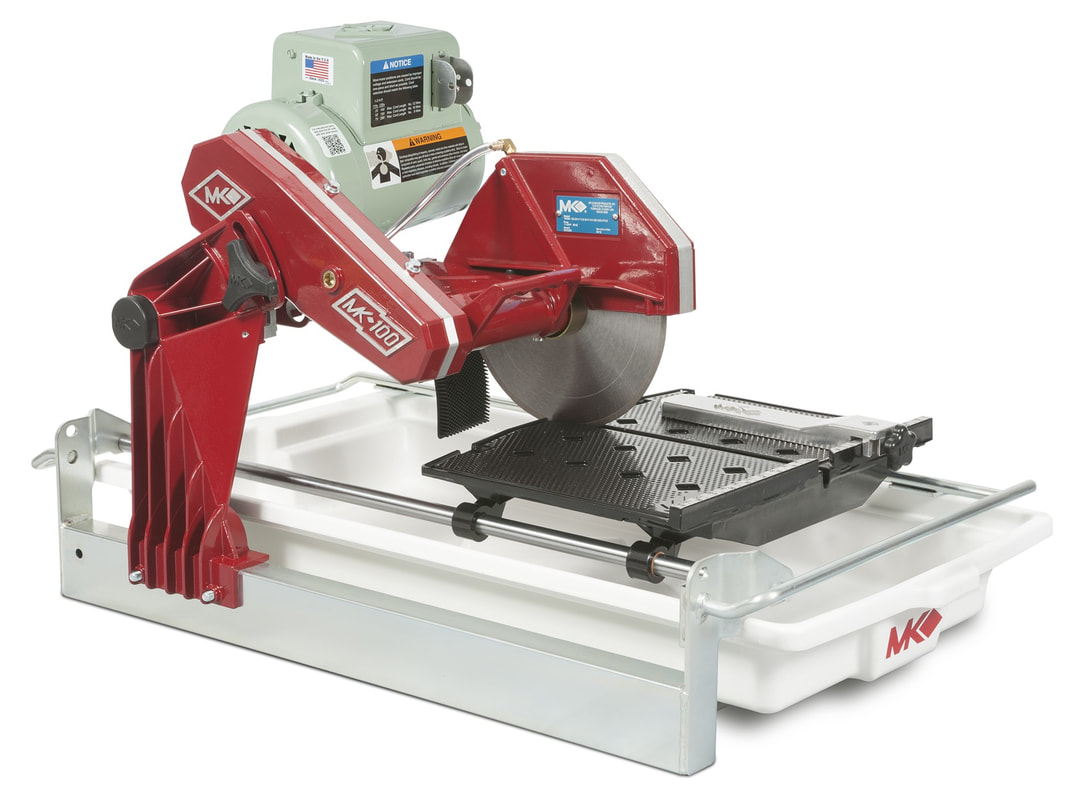 Step 2: Choosing Your Bottles In picking a bottle to cut on your hand tile saw, remember that knotty, rough or then again odd-molded containers are somewhat more difficult to cut straight. The bottle in the center is frequently conceived Cabernet Avignon, Bordeaux mixes and such. The shape takes into account all the more straight cutting and a taller chamber. The container on the privilege is right around an impeccable decision, enabling you to cut rings the distance to the highest point of the container or to give a considerably taller barrel. Keep in mind this smidgen of data when looking for containers, particularly at a reusing focus. What's more, talking about reusing, don't feel blameworthy at all about just getting a couple of rings out of a container. Keep a major tub nearby to put every one of the pieces into, at that point make certain to take them to the reusing focus. Step 3: The Hubs and the Nubs Something else to note is the punts, which I affectionately allude to as stubs or centers on the base inside numerous bottles. When you initially start cutting a container from the base, remember that you just need to slice through the glass enough to isolate the rings or then again for this situation, the base, from the bottle. You should need to spare these centers, who knows when another thought may strike. Who knows, you may think of an awesome idea for utilizing them. Step 4: Setting the Rip Guide for Straight Cuts If you lean toward uniformly sized rings, make sure to set and note the width of your cut. For those intending to make numerous rings, record the position of the tear direct with an indelible marker. The tear direct is a bar which runs vertically over the saw table. Most saws accompany both inch and centimeter marks. Somewhat unscrew the handle, modify each side of the tear control, making certain they are both the equivalent, fixed handles. Step 5: Finish Cutting the Bottle Into Rings Keep cutting until the point when you have achieved the last segment of the bottle which can be cut equitably, ordinarily before the neck, until the point that the container is totally cut into rings. Remember, you don't need to work with the minor segment at the highest point of the container. It isn't inefficient to utilize another container as long as you restore the pieces to the closest reusing focus.
0 Comments
If your shower head is stopped up with long stretches of lime scale develop, at that point it's the ideal opportunity for an intensive clean! There's no compelling reason to go after the unforgiving chemicals however as they could damage your shower head, take a stab at utilizing vinegar. In this blog, we share our best tips on the best way to descale a showerhead. You'll need:
1. Remove the shower head Remove the shower head from the hose. If you are thinking that it's difficult, fold an old cloth over the association and turn it with a torque. 2. Place the shower head into a bucket Place the shower head in the bucket or compartment and load with enough white vinegar to cover it. The acids in the vinegar will disintegrate the white mineral stores. 3. Soak the shower head in vinegar Leave the grohe rain shower head to absorb the vinegar medium-term or for no less than 30 minutes relying upon how terrible the limescale develop is. If it's produced using metal, take it out following 30 minutes. 4. Scour deposit away with an old toothbrush Remove the shower head from the vinegar and give it a perfect wash, you should see the limescale stores chipping off. Buildup can be scoured away with an old toothbrush. Spotlight on the spouts, this is the place most of the limescale develop will be. Tenderly clean finished any deposit and wash with chilly water. Do this until the point when all the deposit has gone. 5. Dry the shower head Take a drain fabric and clean the shower head, wipe until dry and there are no water spots. The shower head would then be able to be screwed back onto the hose. Turn on the shower to flush out any buildup the toothbrush didn't get. 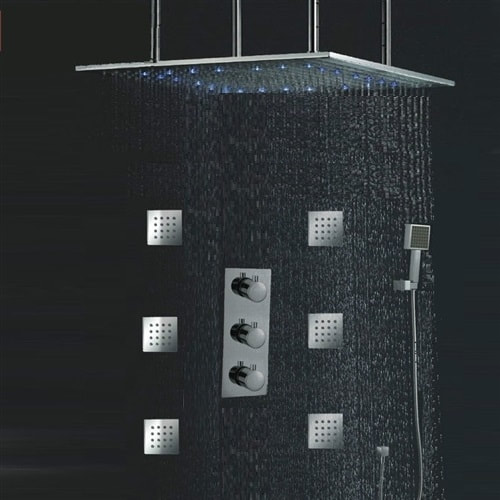 Top tips:
DESCALING A FIXED SHOWER HEAD You'll need:
1. Fill the pack with vinegar Fill the plastic pack mostly with vinegar, take mind not to fill it, however. 2. Place the bag over the shower head Hold the bag under the shower head and open it. Gradually bring it upwards until the point that it covers the shower head and the shower head is in the vinegar. 3. Secure the plastic bag The plastic bag should be anchored to the shower head. Hold the highest point of the bag firmly around the shower head and tie a bit of string around it guaranteeing it's tight and secure. Relinquish the pack ensuring it won't tumble off before venturing ceaselessly. 4. Leave to soak Leave the shower head to soak for 30 minutes or medium-term contingent upon how terrible it is. If the shower head is produced using metal, remove the pack following 30 minutes. The procedure can be rehashed after you've washed the shower head if required. 5. Remove the bag Painstakingly unfasten the shower head, tip the sack over and void out the vinegar. Turn the water on to flush out any limescale stores. 6. Scrub with an old toothbrush Scrub the shower head with an old toothbrush concentrating on the spouts, switch the water back on to flush out any deposit. Scrub with a delicate material for a shimmering Scrub wrap up. Hot soften glue is a flexible cement usually used in crafts. Be that as it may, utilizing it can be very sticky and untidy. Frequently you wind up putting a greater amount of the dissolved glue on yourself and your surroundings than on the things you are working on. Since hot glue dries rapidly once it begins to cool, tidy up can sometimes be precarious. Here are several things you can do to expel hot glue from different surfaces. Removing Hot Melt Glue from Fabrics At the point when hot glue sticks to texture, it can be a significant test to expel the buildup on the grounds that the cement can go into the strings and filaments of the material. Since hot glue works best on permeable materials, you should accomplish more than pull on the cooled glue to clean it from the texture. 1. Place the Fabric in a Freezer To expel hot glue from textures, you can attempt to cool the influenced zone by either putting it in a cooler or in a cooler loaded with ice. Enable the dap glue for ceramics to chill and after that rub the buildup with a scrubber  2. Use Acetone You can likewise utilize CH3)2CO to expel any overabundance on a texture. Hose a cotton ball with the CH3)2CO, wipe the influenced zone, and smear it off with a spotless material. Remove Hot Glue From Your Skin Hot glue on the skin can sometimes prompt minor consumes, so you should rehearse alert at whatever point you utilize it. Nonetheless, notwithstanding when you are watchful, you can get some on your skin. 3. Rub with Ice Cubes and Dab with Oil Give the glue cool before you a chance to endeavor to expel it. Rub the influenced skin territory with ice 3D shapes or wash it with chilly running water. Either strategy will rush the cooling and solidifying process. Once the glue has cooled, touch oil on the region. Oil can help disintegrate the glue, which you would then be able to peel off of your skin. Remove Hot Glue From Nonporous Materials 4. Use Alcohol To remove any hot glue from nonporous materials like plastic, metal, or glass, use liquor or isopropyl liquor. This slackens the glue from the surface of the material and accordingly makes it simpler for you to expel it. Simply douse the surface with the liquor and let it remain for a couple of minutes. You would then be able to remove any deposit with a scrubber or a blade. Make sure to work in a very much ventilated territory, far from any blazes. Remove Hot Melt Glue from Wood 5. Use Denatured Alcohol Remove hot glue from wood may require a stronger cement remover, for example, denatured liquor since wood is a permeable material. Touch a cotton ball with the liquid on the influenced territory to soften the glue. When it has softened, wipe it off with a delicate material. Get more information about glue visit our site: Review Classic. If your shower feels more like a science try than a spa, attempt these simple traps to influence it to sparkle. Biggest Challenges 1. Soapy film on tub and tiles soiled grout 2. Sluggish drain 3. clogged up shower head Fastest Fixes 1. Zap scum and mildew. Before you get your most favorite tub-and-tile splash cleaner, ventilate the room by opening a window or if nothing else the door. Then work on the shower in three vertical areas this will eliminate exhaust and keep the cleaner from drying before you wipe it. Shower the primary segment, covering both tile and tub, and give it a couple of minutes to enter (utilize an opportunity to go get a container for the following stage). Presently, shower the second area, and let it drench while you clean the first. With a wet scrubber wipe , wipe down the sovereign territory, utilizing wide strokes to cover the most surface at all time; flush the wipe. Fill your glass with water and flush the cleaned zone. At the point when the primary area is done, shower the third segment, then wipe and wash the second, trailed by the third. For any outstanding grout stains, stir up one section fade and two sections water in a splash bottle. Give it a chance to absorb for a couple of minutes. Turn on the shower for a moment so it can self-flush, and give any outside-of-the-stream detects a quick sprinkle with your glass.  2. Clear the drain. It's a genuine killjoy to remain in a puddle on the grounds that your drain's ceased up. No doubt, the obstruct guilty party is hair. To settle: Untwist a wire holder and slide one end inside the drain to jab down or haul out any bunches of hair. Then blend 1/4 glass alkali in a quart of bubbling water, and empty it into the drain to break down cleanser covering the funnels. 3. Restore the spray. If the water from your shower head is shooting every which way, or your low-stream has turned into a no-stream, the openings in your shower head are most likely stopped up with minerals. Wipe the dry flotsam and jetsam from the openings with the scrubber wipe you utilized for the tile. Still not spraying straight? Blend an answer of a balance of white vinegar and water (you'll require around one container), and empty it into a plastic pack. Put the plastic sack around the shower head, so the openings are inundated in the fluid and secure the box to the pole with a turn tie. Enable it to douse no less than 15 to 20 minutes . Remove the pack and wipe away relaxed stores; run the shower on hot to flush the openings. Aah, now don't you hunger for a good, long shower? Make It Easier Next Time
After some time mineral stores can develop which can make the spouts squirt water every which way or obstruct totally, abandoning you with poor water pressure or low stream. Here are our best tips to help recover your shower make a beeline for crest execution. 1 Rub the Nozzles Many shower heads have flexible elastic spouts. You can remove mineral development in these spouts by basically kneading every spout with your finger. You can likewise attempt tenderly scouring the spouts with a toothbrush. 2 Soak the Shower Head in Vinegar • If you like to leave the shower make a beeline for the pipe leaving the wall, you can fill a plastic pack with vinegar and fold it over the shower head. o Secure the sack around the head with an elastic band, tape, or a curve tie. o Leave the sack around the shower set out to you a couple of hours. o Remove the sack and turn on the water for a couple of minutes to get the vinegar out of the shower head. • If you wouldn't fret expelling the head from the shower pipe, you can submerge the shower head reviews in a compartment brimming with white vinegar. o Let the shower head absorb the vinegar for a couple of hours. o Re-join the shower make a beeline for the shower pipe and run water through the set out toward a couple of minutes to get out the vinegar. 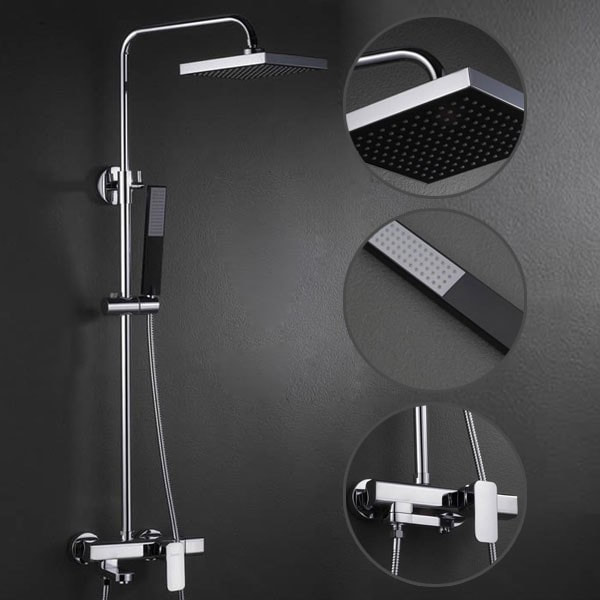 3 Clean the Filter Screen To clean the channel screen, you may need to counsel the shower head direction manual. In the event that you didn't keep the manual, don't freeze! You can normally discover it on the brand's site or by reaching the client benefit division. As a rule, the channel screen is situated in the piece of the shower head that associates with the pipe. You should remove the shower head from the pipe to get to the channel screen. In most Waterpik® mark shower heads, the channel screen can be removed by tenderly brushing the sift through. Or on the other hand you can utilize tweezers/needle-nose forceps to get the screen out of the rotate ball. Once the channel screen is out of the rotate ball, run the screen submerged for a couple of minutes to flush out any development. You can likewise utilize a toothbrush to delicately brush out mineral stores. Place the channel screen once more into the rotate ball and re-introduce the shower make a beeline for the shower pipe. Important Note! Unforgiving cleaning synthetic compounds may harm your shower head and are not suggested for cleaning. For more information: Reviewclassic. A shower is usually the center point of the morning strategy of each human. Shower panel is the center point of the entire bathroom and it is important that the shower is that one piece which builds your bathroom stylistic theme. It is, where you can unwind and appreciate the delightedness of dilute pouring your body. Shower panels history If we think back a couple of hundreds of years; the approach of showers in rooms which are like bathrooms these days can be gone back to times when the Ancient Greeks lived. In nowadays the primary concern why we utilize shower is a direct result of cleanliness and cleanliness in the bathroom and that we can basically accomplish with introducing a shower panel home depot which would we be able to likewise name a cutting-edge vanity for the bathrooms. 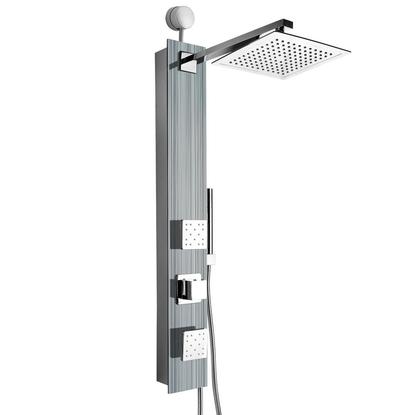 Shower panels highlights There are a variety of shower panels accessible available and as a result of the extremely propelled technology, you can likewise get from exceptionally essential ones to the most elevated tech prepared ones. You can choose from different materials, different shower nooks and so forth. In the wake of perusing about people groups wishes, I discovered that clients are mostly picking those high technologies furnished and with different capacities shower panels than an essential one. When you are searching for a flawless shower panel you need to have as a primary concern what your desires are, you need to comprehend what sort of style you are searching for and the most important you need to set a budget. If you are searching for somewhat more technology prepared you can get a shower panel with LED lights, Bluetooth, Music input, rubbing panels with kneading planes and awesome precipitation showerhead, you can likewise get a shower panel with against stopping up the framework and so on. In light of present-day technology shower panels usually accompany hostile to stopping up frameworks which are made to avoid obstructing the shower head on account of magnesium and calcium stores in the hard water. The establishment of that sort of framework is truly basic so you don't have to stress over that a great deal. Where to introduce shower panel? When we are discussing shower panels we come to the heart of the matter when we need to choose what sort of shower fenced in area we need for our shower. You can't have a shower without a fenced in area since that resembles the shoe without bands. You can choose from the wide range of styles and you can essentially choose the one you like best. For example, you can get an essential shower fenced in area if you lean toward effortlessness and clean lines, however, if you are searching for a more sumptuous and spa looking walled in the area there will be something for you as well! You can choose from sliding glass to fibre entryways. At shower walled in areas, it is important that you ensure the fenced in the area after establishment is totally fixed and the water isn't spilling. As a rule shower nooks are without rust and the establishment is usually not by any stretch of the imagination hard and now and again, you can do it independent of anyone else. Some advanced and tad more costly models additionally accompany split evidence variations which are extraordinary in light of the fact that they don't create breaks. With regards to selecting the best shower for your taste you have a million alternatives to choose from and unquestionably there will be something for your taste and bathroom stylistic theme as well, you simply need to look at all the potential outcomes. dhnkolewdnjoklidjo;lio;lio;lio;lio;lio;lio;lio;lio;lio;lio;lio;lio;lio;lio;lio;lio;lio;lio;lio;lio;lio;lio;lio;lio;lio;lio;lio;lio;lio;lidhjbvc7ueiw7ueiw7ueiw7ueiw7ueiw7ueiw7ueiw7ueiw7ueiw7ueiw7ueiw7ueiw7ueiw7ueiw7ueiw7ueiw7ueiw7ueiw7ueiw7ueiwbcdhnei 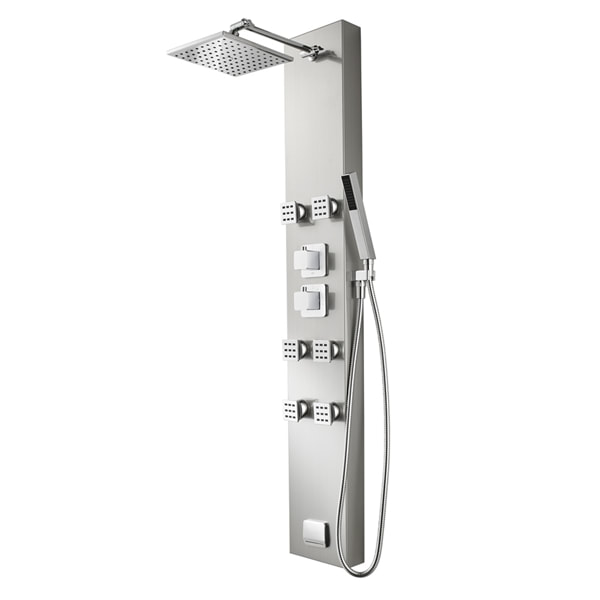 |
 RSS Feed
