|
Many homeowners settle on the choice to replace their old single-handle shower valve in the wake of expelling the divider tile amid a shower rebuild and finding a wiped out looking green consumption covers the valve body and the copper funnels associated with it. No one needs to invest the cash and energy replacing divider tile just to have a water pipe spring a release multi-month not far off. While regularly left to an expert handyman, numerous DIY mortgage holders finish this venture with no problems in several hours. Fixing a shower valve sometimes bodes well. A shower valve that trickles water out its tub gush, for the most part, needs a substitution cartridge. Many single-handle shower valve models utilize a holding nut to hold the cartridge set up. Basically, remove the holding nut and haul the old cartridge out with forceps. A metal holding pin, located over the valve body, holds a solitary handle Moen cartridge set up. Grasp the holding pin-up with an arrangement of pincers and haul it out of the valve body, being mindful so as not to drop the stick into the divider depression. Draw the cartridge with a Moen cartridge extractor apparatus. Lubricate the cartridge's O-rings with a little measure of handyman's oil and push it into the shower valve. 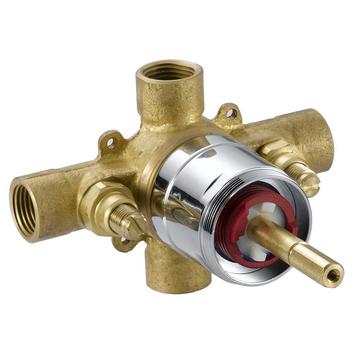 How a Shower Valve Works A cold-water pipe attaches to the valve's left port and a heated water pipe associated with the correct port. The best port sends water to the shower head and the base port, if pertinent, nourishes the tub diverter or gush. A shower-just valve uses three ports: left, right and best. When utilizing a 4-port valve in a shower just application, handymen top the base port. The valve's cartridge controls the watercourse through the system. An enemy of singe gadget automatically changes the hot to cold water ratio, keeping perilously boiling water from consuming the client. Remove the Old Shower Valve Turn off the water to the home at its source. If the house utilizes a decent siphon, turn off the siphon engine's electrical switch. If the building associates with nearby water, close the water framework's primary valve. Turn on the current single-handle shower valve. This discharges any water weight in the funnels. Locate the shower handle's set screw, either found under a decorative top or uncovered underneath the handle. Release the set screw with the appropriate instrument, normally either a Phillips screwdriver or a hex-head torque. Draw the handle of the best shower valve. Remove the trim plate's screws and force the plate far from the divider tile, uncovering the old valve body. If old caulking secures the plate, utilize a screwdriver to separate the trim plate from the tile. Take a gander at the base of the tub gush to decide its expulsion strategy. Some tub gushes string onto a pipe with male strings, be that as it may, others are held set up with a cinch that squeezes the pipe. Squeeze brace tub gushes utilize a little access gap underneath the gush to remove the camp. Slide the appropriate device, generally either a Phillips screwdriver or hex-head torque, into the opening and release the cinch. Draw the tub gush off the pipe. Tub gushes without access gaps turn onto the strung pipe. Grasp the tub gush and contort it counterclockwise. Frequently erosion bolts the strings together and requires pincers for separation. Hold the shower arm still with an arrangement of forceps and turn the shower head counterclockwise. Remove the old shower head, then slide the crest off the shower arm. Unscrew the shower arm, utilizing the pincers for use, from the strung elbow located inside the divider. How to get to a single handle shower valve relies upon the kind of venture included. Amid a total renovation temporary worker regularly remove everything against the divider studs, leaving only totally uncovered pipes and wires. Littler employments may just need a couple of divider tile replaced. When endeavoring to spare the tile, think about opening up the divider on the contrary side as the shower valve. An opening in a storeroom's drywall sometimes makes an effortlessly repairable passageway. Remove the segment of divider expected to uncover the valve and pipes channels. Observe the water pipe's course and any deterrents in the way. The new valve and all channels associate a similar way. Search for spilling funnels and indications of water harm. If the channels don't hint at spillage, however, the divider studs have water harm close to the floor, examine the tub or shower's seepage framework. A tub's shoe gasket, the gasket between the base of the tub and the drain pipe, frequently deteriorates after some time.
0 Comments
Leave a Reply. |
 RSS Feed
